
Today for review I have something a bit different, all you do-it-yourself types are really gonna like this one, it’s a kit to make your own Heatpipe Cooler for your video card from Logisys. It’s not really sold as a kit, but it is a kit nonetheless, made to fit almost every video card out there today. If you’ve ever been curious as to how a heat pipe cooler works then this is your chance to actually build your own and learn something along the way, read on to find out what I learned about the Logisys Dual Heatpipe VGA Cooler..
Logisys Dual Heatpipe VGA Cooler
Reviewed by: Kristofer Brozio AkA Dracos
Sponsor: Logisys

Tech Specs,Features or the Basic Info:
Model #: CF208
Name: Logisys DUAL HEATPIPE VGA COOLER
Description:
This product was designed for professional modders etc.to optimize VGA heat dissipation. Latest cooling technology was applied to the product with dual heatpipes for extreme silent cooling performance. VGA RAM heatsinks were included for overall cooling. Virtually compatible with all types of VGA cards that have original heatsink mounting holes. 12V DC fan was included as an option for extra cooling solution. The fan can be directly screwed in the heatsink. No bracket needed!
Specification:
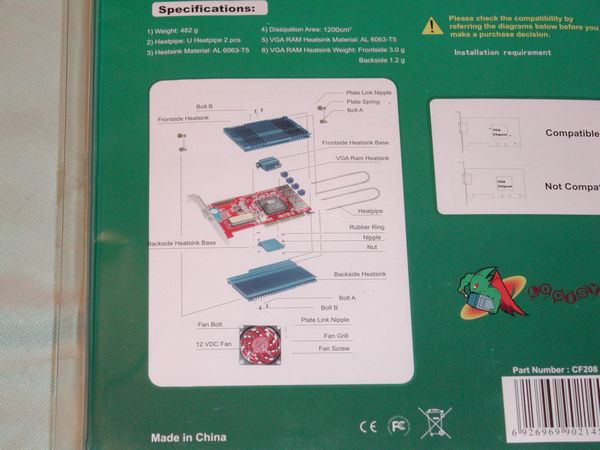
Weight; 482g
Heatpipe: U heatpipe 2 pcs
Heatsink material: AL 6063-T5
Dissipation Area: 1200cm2
VGA RAM Heatsink Material: AL 6063-T5
VGA RAM Heatsink weight: Frontside 3.0g Backside 1.2g
This product cannot be installed on nVIDIA GeForce 6800 GT and 6800 Ultra,nVIDIA GeForce 6600 GT AGP, 6600 AGP, and
PCX 5*** series products
$23.99 from NewEgg at time of Review
A Better Look at Things
:
The packaging is pretty large, it is the standard plastic clamshell type but not the sealed type. Looking at the front of the package we can see most of the parts that will be used in the construction of our very own VGA cooler.

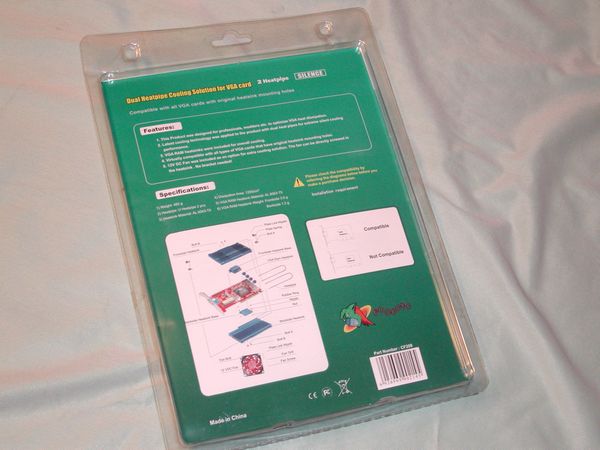
On the back of the package we find some quick specs and features along with a diagram of the basic assembly process.
Care should be taken when opening the package up as things are in there own separate places, and there are lots of parts to keep track of, behind all those parts is an instruction manual.

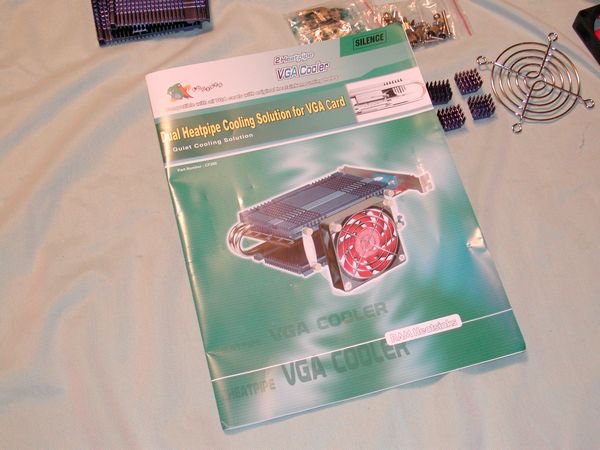
The parts included are not all going to be used, there are two styles of heatsinks and backplates for different types or brands of video cards, Logisys also included lots of extra screws.
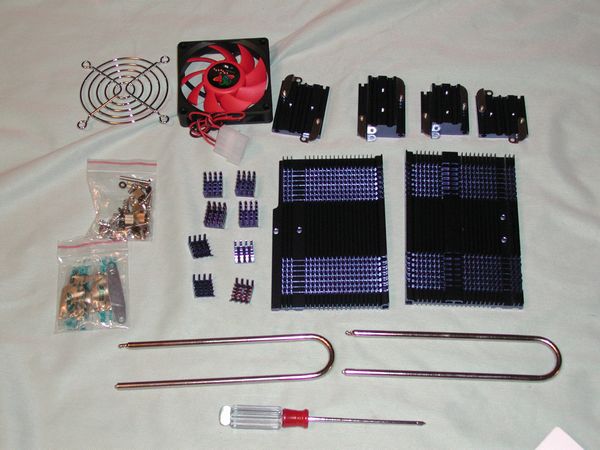
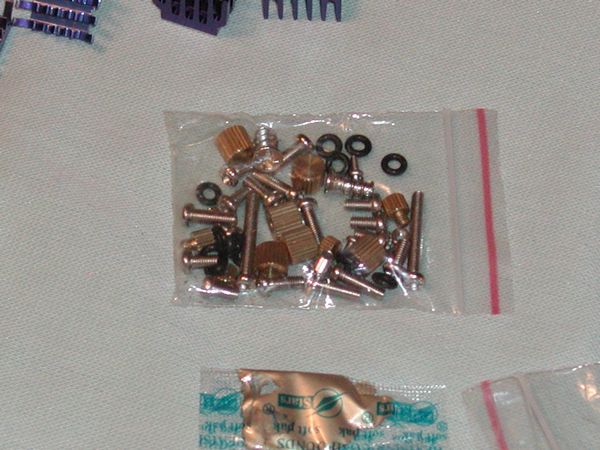
There are two separate parts bags, one contains three packs of thermal compound and attachments for the heatsinks, the other is all the screws and washers that will be needed for the install.


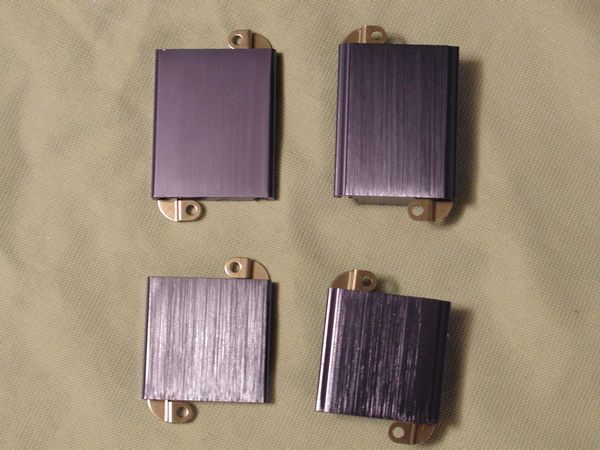
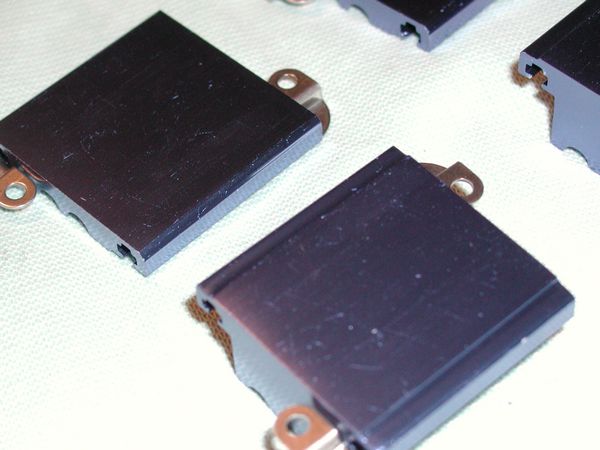
Two types or sizes of ram heatsinks were included, later we will find out that the larger of the two goes onto the front or GPU side of the video card.

There are two large heatsinks which are the main ones for the heatpipe assembly, they are specific for each side of your video card. On the back of each there are slots of the heatpipes and holes for attachment to your card.
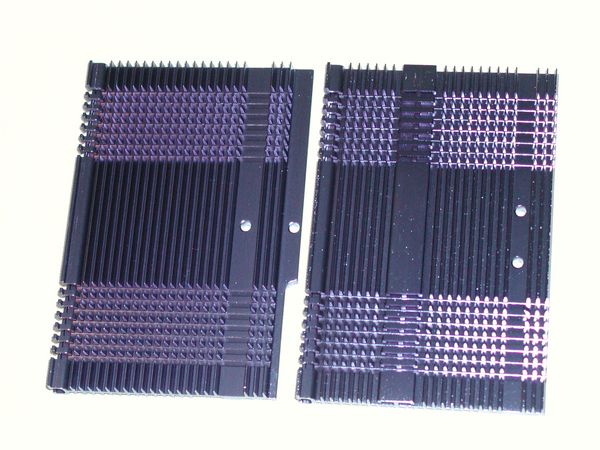

The actual heatsinks for the GPU are pretty large, and there is a matching sized backplate that pairs with it. There are brackets pre-installed on each side of the sinks and plates for the mounting process.

The finish on the heatsinks is decent, not a mirror finish but fairly smooth. I’ve seen much worse…
In all this does seem like it will be a daunting task in itself, but it could be quite a learning experience as well. There are many parts, and the directions need to be followed closely. The parts overall seems very well made and are finished very nicely.
Installation, Testing and Comparison
I have a few VGA cards sitting here but only my 7800GTX supports temperature readings, so I guess i will be using that for this review. It should be nice to see how this kit fairs against a card that runs as hot as a 7800GTX does, a real test of its’ quality and performance.

First we have to apply the thermal compound onto the GPU and then the heatsink gets attached with screws, rubber washers and nipple tipped screw caps.


On top of those caps will sit the backplate which is then attached with a female threaded thumbscrew type of screw. Both of those steps are fairly easy to do. I did find that the screws that the manual says to use don’t seen to be the correct one, the ones it says to use in the manual seemed to be to short and I could not attach the rubber washer and the back screws, not enough threads were showing through. So i decided to use a different screw and this worked fine.

The next step is to attach the front and back ram heatsinks, easy to do just peel and stick, although I did have a tough time getting the protective cover off of the adhesive…


The next step is to apply more thermal paste to the top of the heatsink and the main heatsink, the thermal compound goes into the channels where the heatpipes will sit and where the heatsink and plate will meet.

Now I can install the heatpipes and attach the top main heatsink.
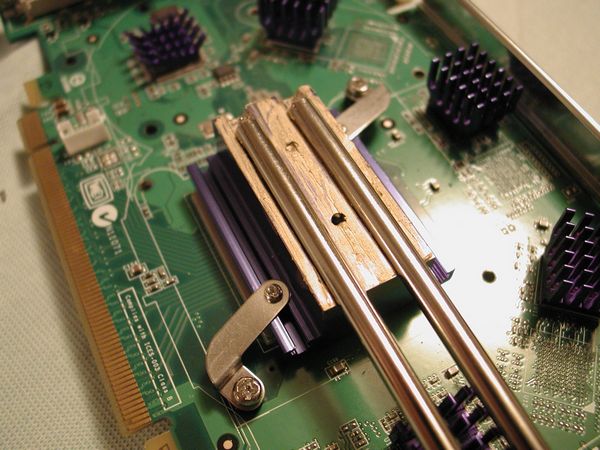

On the back side the same procedure is used and we can attach the back heatsink as well.


Installation Continued…
The fan needs to be put together with special female threaded thumbscrews and regular screws, the heads of the screws are slid through a channel in the side of the top heatsink and tightened to complete the fan installation. The same type of procedure is used to install the brackets that hold the two heat plates together.


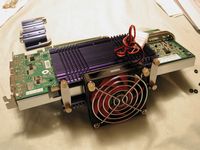
And there we have it a completed and installed self made Dual Heatpipe VGA cooler.

{amazon id=’B000GFYGWC’ align=’right’}
Let’s see from start to finish it took me about 45 minutes to get everything done, and that includes removing the stock heatsink, assembling the Logisys Dual Heatpipe VGA Cooler and installing it in my system. I believe the time could be cut down if the instruction manual was more accurate on which type of screws to use as I spent about 10 minutes just trying to get the main GPU heatsink installed trying to figure out which screws to usse.
The completed assembly does add a bit of weight to the card, not much more so than others on the market I have seen though. There is no fan speed controller for the fan, just a straight Molex connection, but the fan is very quiet when running so I don’t really see the need for a speed controller here.
Testing and Comparison…
Onto testing, let’s see what this thing can do when compared to the XFX stock cooler, and my Corsair Nautilus liquid cooling system.
Ambient temperature hovered between 26.5-27.2c during testing. To get some heat in the core of me GPU I ran 3dMark06 and recorded the highest temps.
IDLE:
Logisys: 47c-48c
Stock: 54c-55c
Liquid: 39c-40c
LOAD:
Logisys: 67c-68c
Stock: 75c-76c
Liquid: 43c-44c
A nice improvement over stock and much quieter than the stock cooler. The Logisys Dual Heatpipe VGA Cooler looks much better than the stock cooler as well, the XFX cooler is rather plain and you can’t even see it when installed. The performance is very good and having built it myself I am kind of proud of it, it not only looks good but works!
Summary:
The Logisys Dual Heatpipe VGA Cooler is a learning experience and a great performing VGA cooler all in one. The quality of the Logisys Dual Heatpipe VGA Cooler is excellent, as is the performance, it is on par with many other after market coolers out there today, and the low price point is a major bonus.
I don’t know where you could get such good performance and quality for such a low price other than Logisys. Overall it’s an excellent VGA cooler that I can recommend to anyone, despite the problems with the manual with the possible misprint on which screw to use the Logisys Dual Heatpipe VGA Cooler is great choice to replace your stock VGA cooler.
DragonSteelMods give the Logisys Dual Heatpipe VGA Cooler a 5 out of 5 score.

{amazon id=’B000GFYGWC’ align=’right’}
Pros:
-Low price
-Excellent quality
-Great performance
-Lots of extra parts
Cons:
-Manual needs work…
