

Liquid cooling is very popular now, at one time it was more of an enthusiast only cooling option, but today many companies make liquid cooling kits for the DIYers out there. The more extreme enthusiasts use TEC cooling to really lower their temps for higher overclocks. So what do you get when you combine TECs and liquid cooling, and a company that wants to make it much easier for everyone to have top of the line cooling? You get the Freezone from CoolIt! The Freezone combines the best of everything, liquid cooling, TEC modules and a compact, easy to install system that anyone can utilize to make their system nice and cool. I installed the Freezone in both my Intel and AMD setups and took it for a spin to see what it could do, so continue on to learn more…
CoolIt Freezone CPU Cooler
Reviewed by: Kristofer Brozio AkA Dracos
Sponsor: CoolIt Systems
Tech Specs,Features or the Basic Info:
Freezone CPU Cooler
Remove the heat to raise the speed limit.
Freezone is a CoolIT Systems Inc. patented product that removes heat from individual components and transfers the heat outside the computer case. It combines facets of air-cooling and liquid chilling through purpose-designed internally installed components. It can aggressively remove heat from a computer quietly, efficiently, and reliably. This system alleviates any risk of condensation, is highly effective, and is easy to install.
To provide concentrated cooling of a small surface area, Freezone uses environmentally friendly liquid coolant as the primary dissipating medium, which absorbs heat much more efficiently than air. The patented system configuration includes multiple TECs (thermoelectric coolers) that provide unique liquid chilling for superior thermal performance.
In addition to keeping the CPU cool, Freezone actually provides cooling for other vital components while improving system level acoustics. By removing heat from the source and transferring it outside of the chassis, internal PC temperatures are held low. This removes the need for multiple case fans, which eliminates unwanted noise and improves the reliability of other peripheral hardware such as the hard drive.
The Freezone CPU Cooler includes: a Chiller / Pump Module, a Thermal Control Module (TCM), and a CPU Fluid Heat Exchanger (FHE). This universal sealed closed-loop maintenance free system is pre-plumbed and charged for simple bolt-in installation.
Specs:
CPU FHE (Fluid Heat Exchanger)
Design – Monolithic copper,multi-cell,single channel
Dimension – 42mmx42mmx17mm
Weight – 195g
TCM (Thermal Control Module)
Design – Dual IC SMT PCB w/outboard IC sensor
Input – 12VDC, 5VDC
Dimensions – 89mmx53mm
Weight – 30g
Function – Thermal controller to adjust TEC and fan power output
Chiller and Pump Module
Heatsink
Design – Dual dissipation plate,anodized alloy,laminar flow array
Dimension – 122mm x65mm x90mm
Weight – 850g
TECs
Design – Six solid state heat pump wafers
Dimension – 40mm x 40mm x 3.5mm (each)
Weight – 20g (each)
Function – Active coolant thermal reduction
Chiller FHE's
Design – Dual anodized alloy distribution, multi-channel w/laminar flow
Dimension – 121mm x 41mm x 12mm (each)
Weight – 80g (each)
Fan
Noise – 26dBA – 37dBA
Bearing type – Enhanced life ceramic
Life cycle – 50,000 hours
Dimension – 92mm x 92mm x 25mm
Function – Heatsink convection, chassis exhaust
Pump and reservoir
Design – 12VDC coreless outrunner pump w/integrated expansion vessel
Bearings – Dual in fluid sapphire bearings
Noise – <15dBA
Life Cycle – 50,000 hours
Dimension – 50mm x 50mm x 75mm
Weight – 380g
Price: $399.99 USD
A Better Look at Things
:
The first thing we look at is the packaging, and CoolIt did an excellent job with it. It's a very large box, with all sorts of information all over it including many quotes from various review sources.
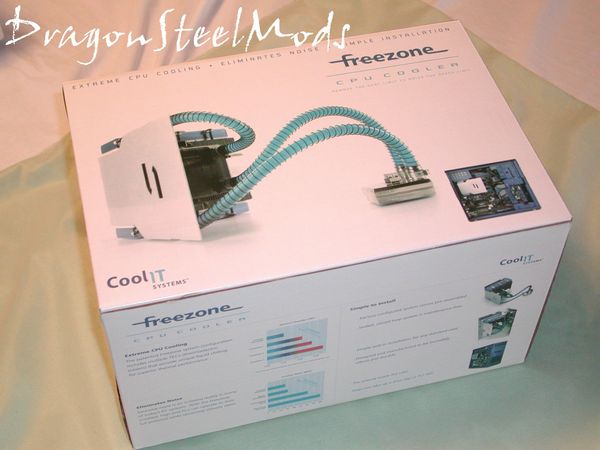
As expected all the specs and features are listed as well.

Opening up the box we find another styrofoam 'box' inside that outer covering. On top is the user manual, an important warning, under that we find the mounting brackets for various sockets.


The top of the styrofoam box is actually a lid in itself, lifting the lid we find compartments with assorted pieces of the Freezone.
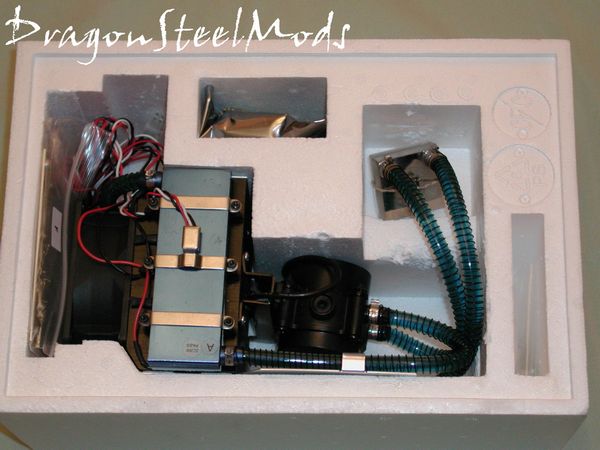
Included is everything you need to get the Freezone up and running, we'll take a look at all the pieces individually on the following page.

A Better Look at Things
Continued:
Each bag is labeled with a letter or letters that correspond to the installation instructions in the manual. CoolIt includes thumbscrews, standoffs,washers screws and even a little tool to help with the installation that can also be used to adjust the potentiometer on the TCM or Thermal Control Module.

There is another bag with more standoffs, screws and washers along with a separate mounting plate to install the Freezone using standard 120mm mounting holes if you case does not have 80mm holes.


The actual mounting brackets are very interesting, the first time I saw them I was like 'WTF are these for?' and then I started reading the directions and checking out the pictures in the manual and understood what they were for. In the installation section you'll see just how they work.

Before we get to check out the Freezone there is one last important piece to look at, the Thermal Control Module, the TCM could be considered the brains of the Freezone as it controls it all.

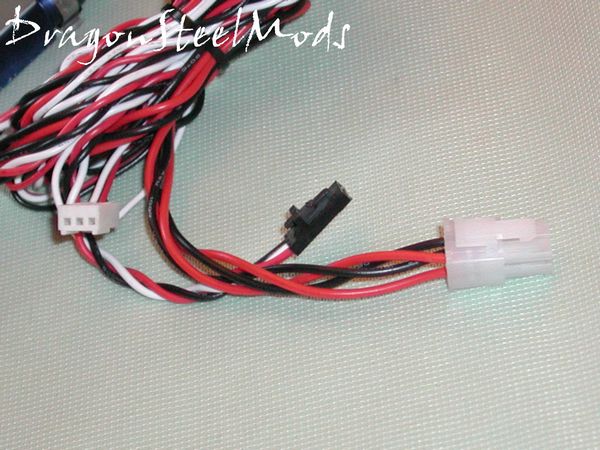
The TCM has special connectors on the left side that connect to the Freezone itself to provide power and temperature monitoring. There is a standard Molex connector on the right side for the overall power of the unit.

The TCM also provides three 3-pin fan connectors as well, one of which is for the fan of the Freezone itself. Above the fan headers, near the top of the PCB board is a small square with an 'X' in it, that is the potentiometer to change the cooling ability of the Freezone.

On the bottom of the TCM we find a couple pieces of double sided tape to mount the TCM wherever you would like to.

A Better Look at Things
Continued:
–
–
–
–
–
–
–
–
–
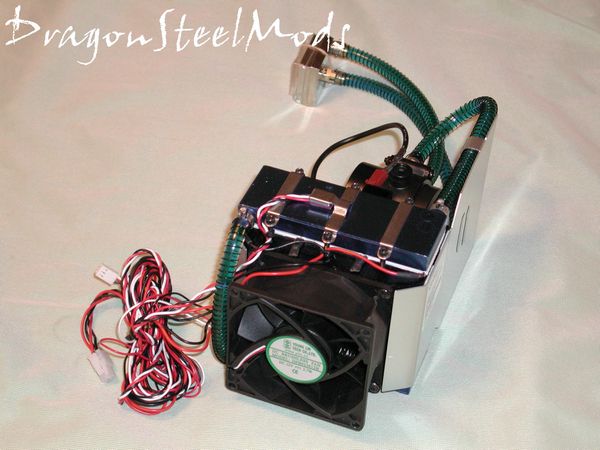
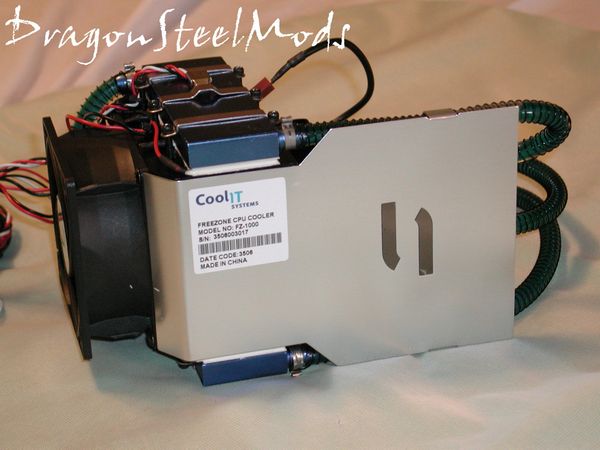
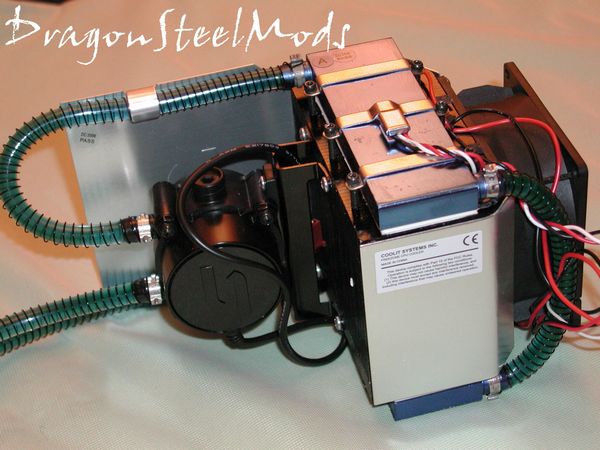
The CoolIt Freezone is an interesting looking device, it is fairly heavy and appears to be very well made with a lot of attention to details. Before I get into looking closer at the actual parts of the Freezone I thought I would add a few pics from various angles, sort of a 360 degree view of it.

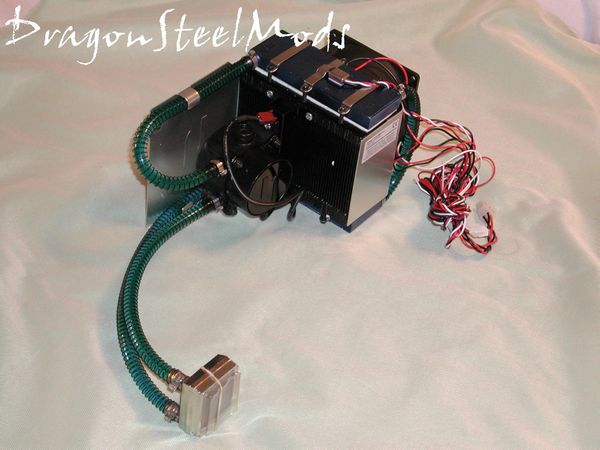
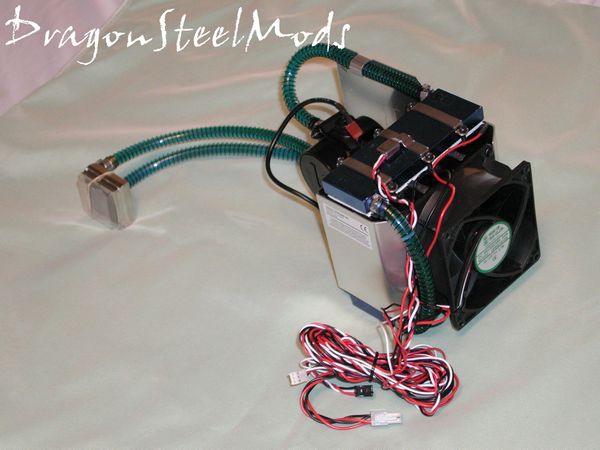

As you can see there are quite a few wires coming from the Freezone, they actually all combine to make just three connections, main power, temperature sensor and a speed sensor for the pump to connect to your motherboards CPU fan connector.

The Freezone is heavy, I won't lie to you, I was quite surprised at just how heavy it is. The picture below is the main side view that would be seem from outside of your case, that is if you have a window in your case. The aluminum piece bears the CoolIt logo and an informational sticker as well, for the most part it is more decorative than anything, but it does hold the tubing in place at one section.
The Freezone comes pre-filled and ready to go, all you have to do is get it installed and power it up. Most of the pre-built liquid cooling kits are kinda cheap and a bit bulky, but the Freezone manages to get all the pieces into a small footprint, all-in-one setup.

You can see the coolant inside the Freezone is a greenish blue in color and the hoses are wrapped in a metal spring for support, all in all there really isn't much to the Freezone if you look at it.


A Better Look at Things
Continued:
–
–
–
–
–
–
–
–
–
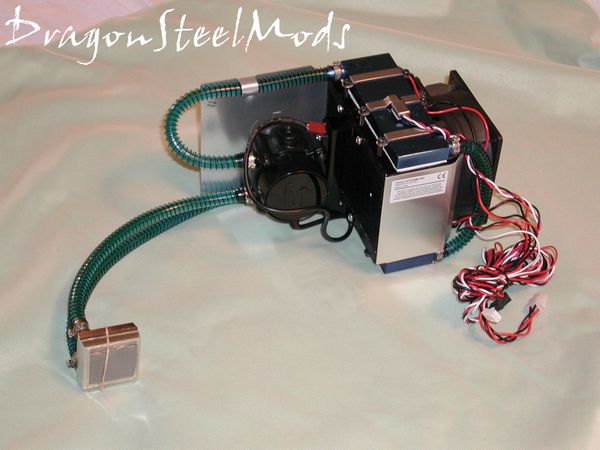
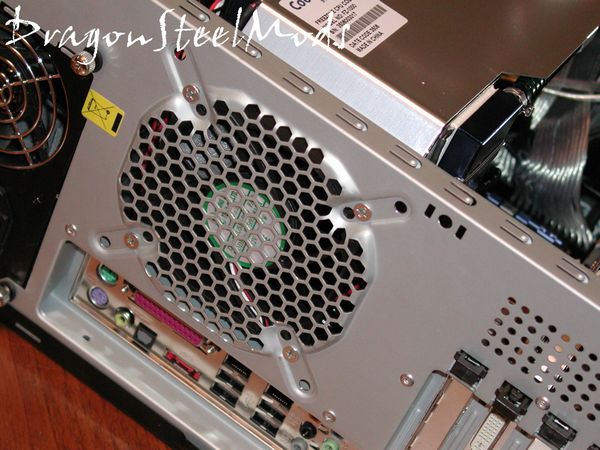
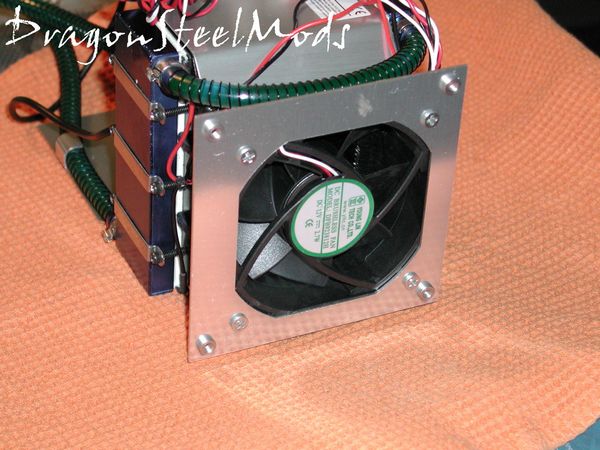
On the end of the Freezone is an 92MM fan that is used to cool everything off, but it is also used to mount the system in your case.


The plate that is on the front side has a smaller complimentary plate on the back side as well, this plate also has a sticker with some information on it, FCC stuff basically.

The pump mounts directly to a large heatsink, and on top and bottom of the heatisnk are where the TECs are located and the where the chillers are as well. The top chiller has the thermal sensor attached to it so the Thermal Control Module can monitor the temperature of the fluid inside the chiller.


The pump itself is rather small, and I can say that is is fairly quiet compared to others I own and it has the CoolIt logo on it as well.


A Better Look at Things
Continued:
The heatsink is used to keep the hot side of the TEC cool to allow the cold side of the TEC to get cold and stay cold.

As I mentioned the heatsink sits in the middle, with TEC modules on the top and bottom, and then chiller modules on the cold sides of the TECs. The fluid comes into the TEC to be cooled and cycles back to the CPU to cool it down and collect heat.


The actual CPU block has a cross type mounting slot on top of it for the wire mounting brackets, you'll see how that works exactly shortly. My first impression of the actual CPU block was 'bleh', it just doesn't seem to be as high quality as the rest of the Freezone unit, it's just not quite as nicely finished as I would have expected it to be after seeing the rest of the unit.

The CPU block comes with thermal paste pre-applied and a protective plastic cover over that, so I can't really show you what the base looks like, but during my second installation I did get to examine it further and found that it is nicely finished with a few minor finishing scratches here and there. Other than that it seems like a well finished base and appears flat.


Installation, Testing and Comparison LGA775:
Ok, now comes the fun part, the installation of this baby! I first installed the CoolIt Freezone on my Intel P4 955X system with ASUS p5wd2-e premium motherboard with 2 gigs of Crucial 10th Anniversary ram. Of course that's an LGA775 mobo so there are four holes, we need to use four stand offs, four screws and eight washers, washers go on either side of the motherboard.

Nice and easy to install, just screw them into place. Of course with any installation that requires removing the motherboard from the case, extra time and care is needed to make sure things go the right way.

To actually install the CPU block, I needed four thumbscrews, and the LGA775 brackets, they are sort of 'S' shaped. They are a bit difficult to get installed honestly, it kind of requires another couple fingers to get it just right, but alas I made do with the ones I have. You can see from the picture how the bracket installs, one of the 'S' shaped mounts attaches to the bottom right hole and then to the top left hole, while the other crosses over it and attaches to the bottom left hole and top right mount. There were no clearance issues at all, more than enough room for everything.
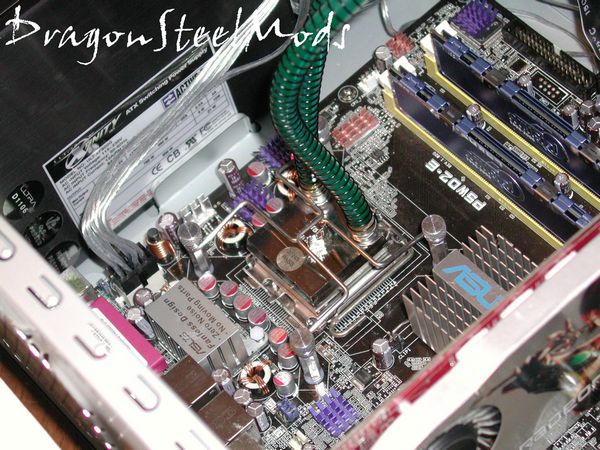

CoolIt recommends mounting the Thermal Control Module along the drive bays, but since this wasn't going to be a permanent installation, I sort of left it hanging about. In the following picture you can see the connections all made with everything ready to go. All the wires coming from the Freezone do make for quite a mess and some wire management is needed to control things a bit. Once the Freezone was actually installed in my system I didn't find any clearance issues at all, I did expect some being it is so large, but there were no problems at all.


The case I used for the install was a Coolermaster Centurion RC532, and it has moutning holes on the back for different sizes of fans so I didn't need to use the included adapter that CoolIt provided.
Alright, let's get to the testing shall we. For testing the ambient temp was about 21.5C, and I ran the Freezone on three settings, High, Medium and Low. The High setting was the potentiometer turned all the way counter-clockwise for maximum cooling, the Low setting was the potentiometer turned all the way clockwise for maximum silence but still good cooling ability. The medium setting is not what you think it is, in the instruction manual there is a section that pertains to optimizing the Freezone for your system for maximum performance. This is done by turning the potentiometer all the way to high and running a load application like Prime95 for at least 30 minutes, recording the temperature, then turning the potentiometer clockwise in increments and waiting at least five minutes between, while noting the CPU temp, this is done until you notice the CPU temp rise, at that point you rotate the potentiometer back to the setting just before, and that is the setting for the Freezone that has been optimized for maximum performance. Yeah it seems like a lot of work, but it's easy really…
To get my idle temps I let the system sit for 30 minutes, to get load temps I ran Prime95, one instance on each core for 30 minutes as well. Of course the Freezone was installed in my machine for seven days with several thermal cycles to achieve maximum performance of the thermal compound, something I make sure to do with any CPU cooler review.

The Freezone set to its lowest setting is virtually silent, I could actually hear the pump over the fan if I put my head close to the case. The Freezone on the medium setting or optimized setting was a bit louder, it was audible but blended in with the rest of the fans in my system. On high though the Freezone is quite loud, but I like my systems to be silent, so my loud might be fine to someone else.
As far as temps are concerned, on high the Freezone produced below ambient temps at idle, and outstanding load temps as well, nothing I have came even close to the temps of the Freezone when on high. In the optimized or medium setting, the Freezone still showed good results, I think it is a nice happy medium, low noise and very good temps. Only the Ultra ChillTEC with its TECs bested the Freezone at idle, even the Ultra couldn't match the load temps. The Freezone on the low setting where it is virtually silent shows some 'ok' temps, nothing to brag about, but still very good nonetheless, way below Intel specs temps for this CPU.
I'm sure though with some good thermal compound like Arctic Silver or Chill Factor we could shave a few more degrees off those temperatures.
So, basically I wouldn't run the Freezone on low, the medium, or optimized setting is really the best bet for all around use. Sorry I didn't get the chance to get any overclocking in, but I would have set it to high to do that obviously…
Well continue on to see the installation and results for my AMD platform…
Installation, Testing and Comparison AMD939:
Ok, I've got an EVGA NF4 Micro-ATX SLI motherboard with 2 gigs of OCZ Spec Ops ram and an AMD X2 4200+ CPU. This installation is very similar to the LGA775, except that you only use half of the parts since there are only two holes…

I installed the Freezone in my Antec Nine Hundred Gamer Case (review HERE) and I had to use the 120mm – 80mm adapter plate as the Antec Nine Hundred only had holes for a 120mm fan.
Due to the configuration of this case, the installation was a bit harder, since the PSU is mounted on the bottom of the case things were a bit tighter on the top. The mounting bracket is similar to the LGA775 bracket except for the fact that it bends in, and around and connects to only one mount, so you are connecting two to each mounting standoff. With this particular case the Freezone was a tight fit but I got it in there with minimal hassles.

The same procedure for testing as the Intel setup, Low, Medium and High, 30 minutes idle, 30 minutes of Prim95 on each core to get load. Same ambient temp also, I love climate control!

The first thing you should notice on the graph is the high speed temp, the shortest bars on there, nice temps overall. The optimized or medium setting is very good as well, a nice balance of performance and low noise. The lowest setting is again here one that can be used, but I don't see why, the temps are great, but a good air cooler can do much better.
In essence the results are the same for both test systems, the high setting of the FreeZone is the one that will net you the lowest temps, while the medium or optimized setting is where you want to be, while the low is really just pointless…
In the end, I'm impressed with the Freezone, but not that impressed, don't get me wrong it's a great product, but I just expected more out of it at the low speed setting. Using TECs and liquid cooling should have netted better temps on the lowest setting, at least I would think so…
Summary:
For a product like this you really have to ask yourself what do you need it for, are you overclocking your system and pushing every last Mhz out of your CPU, or are you the casual user or maybe a gamer. It all depends what you need, a casual user won't need a product like this, it's basically overkill or maybe it could be bragging rights. If you are any type of overclocker then this is one of those products that you need to have, and if you are a gamer that demands the best performance from your system then it's for you also. The price is a bit steep, but considering it combines TECs and liquid cooling in an easy to install, self-contained setup, it is worth the money. Building a custom liquid cooling setup could easily cost more than this, not to mention the hours putting it together and installing it, in the end if you have a need for such a product then it is well worth the cost. I for one will be keeping it in my system, I'm very happy with it and can easily recommend it to other enthusiasts out there…
DragonSteelMods gives the CoolIt Freezone CPU Cooler a 4.5 out of 5 and our Recommended Award as well.


Pros:
-Works great, cools below ambient
-Multiple settings for customization of cooling
-Easy install compared to standard liquid cooling
-Fairly quiet-depending on settings
-Fully enclosed system, ready to install out of box
Cons:
-High cost
-Relatively loud on high setting
-Very tight fit depending on case/configuration
I would like to thank CoolIt for the chance to review the Freezone CPU Cooler and for their continued support of DSM.